User guide: Serve view
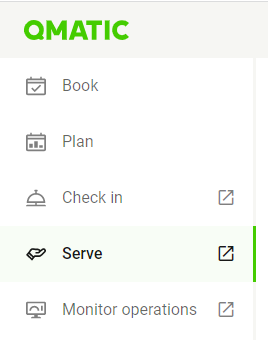
To call and serve customers, go to Serve in the left menu.
You may need to select the branch, service point and work profile. Click Apply settings.
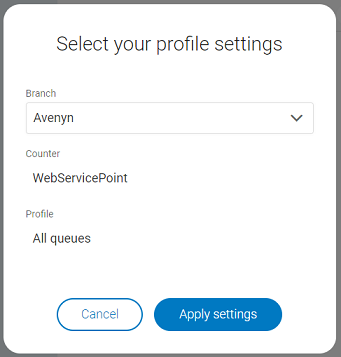
If you need to change these settings while working, click Edit in the top bar.
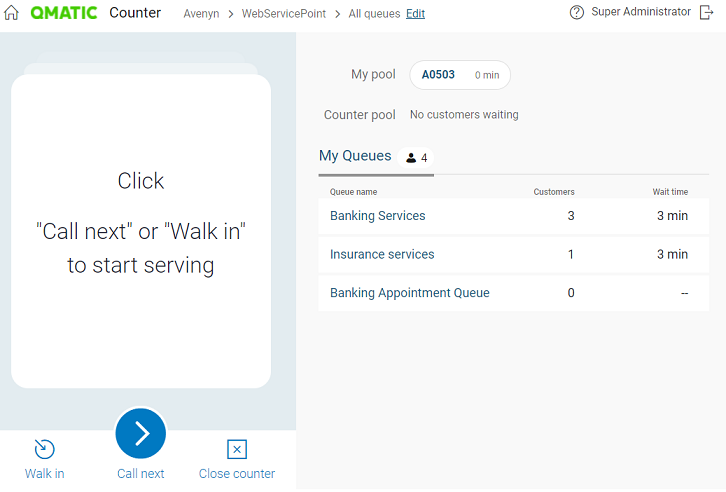
On the landing page, you can see queue and visit information to the right. To the left, you have the working space. Click Call next to call a customer.
To log out, click Log out in the top right corner.
To go back to the portal, click Experience Cloud Portal in the top bar
To read the accessibility statement, click Accessibility statement in the bottom right corner.
Queue view
In the right area of your working space, you can see queue and visit information for the visits that are currently in the queues. Depending on how your system is configured, you can toggle between My Queues and All Queues. If there is only one queue in your work profile, all visits in that queue are shown by default.
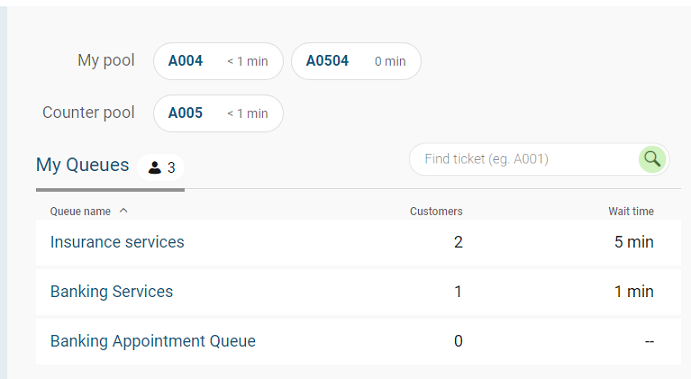
At the top, you can find the visits that have been transferred to your staff pool as well as the counter pool. Pools are used when customers need to be put on hold, or if they need to be assigned to a specific staff member or counter. You can click on a visit in a pool to get the option to call, transfer or remove the visit. Which options you have depend on what your organization allows.
To search for a visit, enter the full ticket number in the Find ticket search field and press Enter.
Queue information
In the list of queues, you find the following information:
Queue name
Customers – number of customers waiting
Overdue – this value is displayed for appointment queues and shows the most overdue appointment, i.e. the visit with the longest time between appointment start time and current time.
Wait time – the waiting time of the first visit in the queue. You will also get an indication if the waiting time is close to the service level
 , or has passed the service level
  .
.
To sort the list, click on the column titles.
Visit list
Click on a queue to expand it and see the list of visits in the queue.
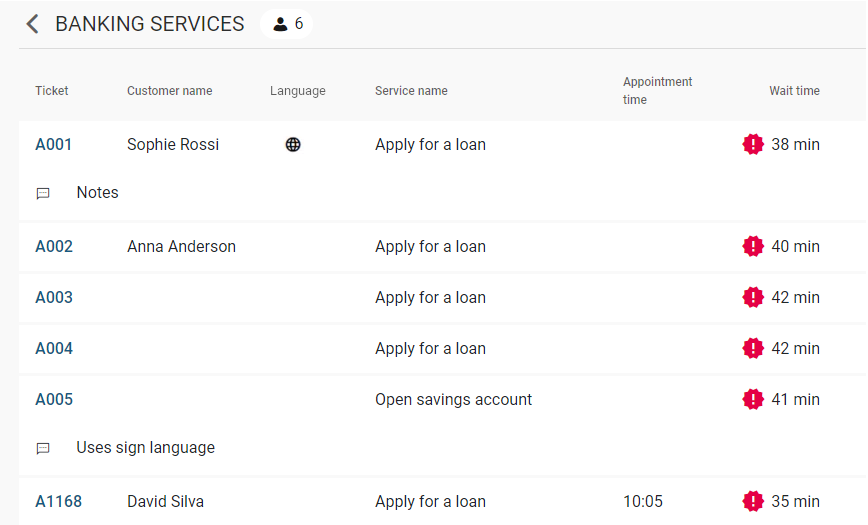
You can see the following information per visit (depending on the settings):
Ticket – ticket number of the visit
Customer name
Service – if there is more than one service, hover over the tags icon
 to see all services.
Appointment time (if the visit is an appointment)
Wait time + indication if the waiting time is close to service level
or has passed the service level .Overdue time – this column shows the time that has passed since the appointment start time, if the visit is in an appointment queue. If there is no value here, it means that the appointment start time is not passed yet.
Notes – you may need to hover over the Notes icon
 to see the full note.
Customer language – you may need to hover over the language icon to see the full language name.
Custom info
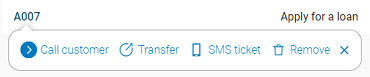
By clicking on a visit in a queue, it is possible to do the following:
Call customer : you can select a visit from the queue and call the customer.
Transfer: you can transfer a visit from the queue to your own pool, to another staff or counter pool or to another queue.
Send SMS: You can send an SMS to a visit in the queue, which usually contains a link to a virtual ticket, so the customer can follow their visit online. The content of the SMS is pre-defined by an administrator.
Remove: you can remove a visit from the queue or pool, for example if it was created by mistake.
Note
Some options may not be available to you, depending on the settings in your system.
Call customer
There are two ways to call a customer:
To call the next customer according to work profile, click Call next.
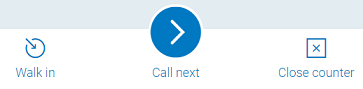
To call a customer out of queue order, find the visit, click on it and select Call customer.
Note
Depending on your settings, it is possible that the next customer in line is called automatically. This feature is called Store Next.
When a customer is called, the system can be set up so that you need to confirm that the customer has arrived.
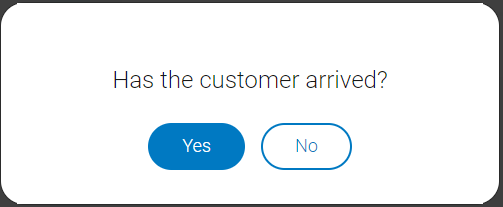
If you click Yes, you can proceed with working with the visit. If you click No, you need to select how to proceed with the customer.
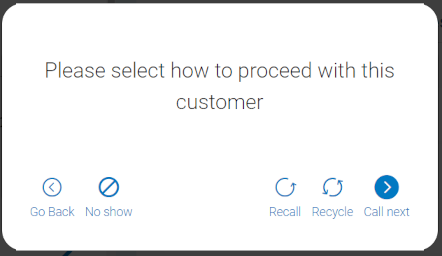
Here you have the following options:
Call the customer again.
Recycle, i.e. put the visit into the same queue after a set number of minutes.
Call the next customer and thereby end the visit.
Mark the customer as no-show. Depending on the settings, this can either mean that the visit is removed, or that the visit is transferred to a pre-defined queue.
Go back to the previous dialog where you will be asked again whether or not the customer has arrived.
If you don't have the Confirm needed setting turned on, you have a few options on the visit card if the customer doesn't show up when he or she is called: recall, recycle, or mark as no-show.
Call customer again

If a customer does not respond to the initial call for service, and you want to call the customer directly again, click Recall. When recalling a customer, the call is re-announced on the displays and through the audio units available in your system.
Recycle visit

If a customer does not respond to the initial call for service, or for any other reason you want the customer to be called again later, use Recycle to put that visit back into the queue at the first position.
Note that the customer cannot be called until a certain time has passed. The default delay time is 60 seconds, but it can be changed in system settings. It is only possible to recycle a visit a certain number of times (default three times).
Mark customer as no-show

If a customer is called and does not show up even after being recalled, you can register the customer as a no-show. The system will save the visit in the statistics, allowing management to track the number of no-shows.
Handle the current visit
Once the customer is called, you can see the following information on the visit card:
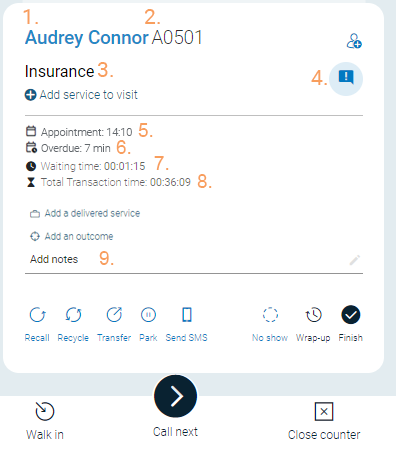
Customer name and a plus sign if there are several customers linked to the visit
Note
The customer data you see in this view depends on how your organization has configured customer data preferences. If you have questions about missing fields or required information, contact your system administrator or manager.
If the customer name is hidden, it will be replaced by a clickable customer icon (
 )
)Ticket number
Current service to be provided and any additional services
Context marketing messages
Appointment time
How much time passed from appointment time until the customer was called
Waiting time from the time the visit was placed in the queue
Total transaction time. With multi-service visits, you can also see the transaction time for the currently served service.
Notes. You can also edit and add notes here. The maximum number of characters for a note is 255. All notes are deleted when the visit is closed.
Custom information shown as Info 1, Info 2 etc (not displayed in image). This is information that your organization needs to be able to provide a service. Depending on the settings, it may also be possible to edit the information by clicking in the field.
Customer language (not displayed in image) shown below the customer name. Depending on the settings, you may be able to change the customer language by clicking on it.
Configurable button (e.g. “Customer details”) for opening an custom URL (not shown in image). For information on how to configure the custom URL, see Customer info handling
Note
For the automatic redirect to work, you need to allow pop-ups and redirects for the Serve / Counter application in your browser settings. If pop-ups are blocked, the Custom URL will not open automatically, and no error message will be shown.
There are also a few actions you can do, which are described in the following sections.
Transfer visit

On the visit card, click Transfer to transfer a visit between queues, staff members or counters.
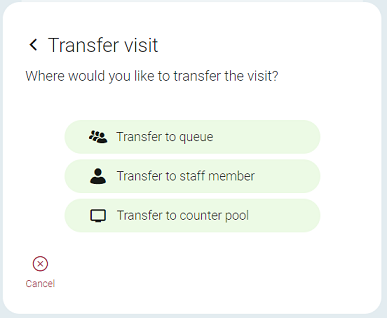
When transferring to a staff member or a counter, the visit will end up in their pool.
When transferring to a queue, select if you want to transfer the visit to first in line
 , last in line
  , based on waiting time
  or with a delay
  .
.
You can also do a one-click transfer by clicking the transfer icon in the queue list. The current visit will then be placed in the selected queue based on waiting time.
Note that you can only do a one-click transfer to non-appointment queues.
Park visit

Click Park to park the visit and send it to your pool. This can be either your user pool or your counter pool, depending on the settings. You can then select it from there whenever you want to resume serving the customer.
Add service to visit

Depending on how your system is set up, it may be possible to add services to an ongoing visit, turning it into a multi-service visit.
Click Add service to visit.
Select a service from the drop-down list.
Click Done.
Serve multiple services
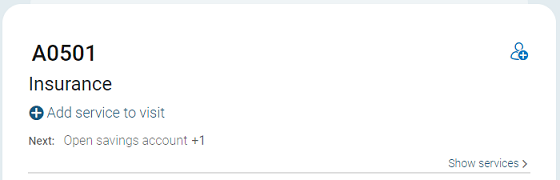
On the visit card, you can see any previous and upcoming services for multi-service visits. Click Show services to show all upcoming services.
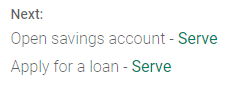
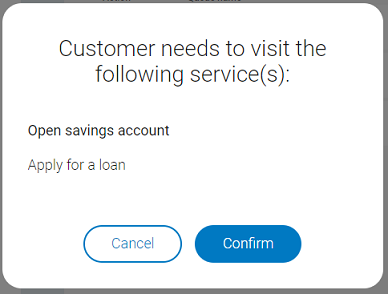
Click Serve to select a service to serve. This action will end the current service which means that if a delivered service/outcome is required, you have to add that first. A message confirming which service you are currently serving is displayed.When you have served a customer, and there are additional services connected to the visit, you are reminded that the customer has more services connected to their visit.
Add customer information

If you add customer information after the customer has been called, it will be visible to any staff member who serve the same customer later during the visit.
Click Add customer to add customer information. You can then do any of the following:
Link an existing customer by searching for it in the search field.
Add a new customer by filling out the form with name, email, address, phone number etc.
Once customer information is added, you can edit it by clicking on the customer name on the visit card.
Send link to virtual ticket

If the customer has taken a paper ticket but want to be able to follow their queue position online, it's possible to send a link to a virtual ticket to the customer.
Click Send SMS on the visit card. Enter the customer’s phone number and click Send. The customer will receive an SMS with a link to Mobile Ticket.
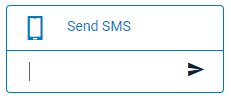
Just like with other notifications, you cannot decide the content of the SMS here. Instead, the content is predefined by an administrator in the notification settings.
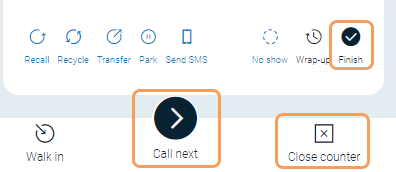
Finish visit
A visit can be finished in one of the following ways:
Click Call next. This will finish the current visit and call the next customer.
Click Finish. This will finish the visit without calling the next customer. The counter will remain open.
Click Close counter. This will finish the visit and close the counter.
Note
If there are additional services connected to the visit, the visit will be placed in the relevant queue for the next service automatically.
Register delivered services and outcomes

Some services require that you register a delivered service and/or an outcome. You cannot finish the visit and call the next customer until this has been done.
A delivered service is typically a more specific definition of the service that the customer initially chose. An outcome is the result, for example if a loan application was approved or denied.
On the visit card, click Add a delivered service.
Select a delivered service.
If required, also select an outcome. In some systems it is also possible to register an outcome without adding a delivered service first.
Click Done.
Register marks

For some services, it can be optional or required to register marks. If marks are required, you cannot finish the visit and call the next customer until you have registered a mark.
On the visit card, click Add a mark.
Select the wanted mark type.
Select a mark and the number of marks to add (max 10).
Click Add marks to visit.
Click Done.
Wrap up visit

Depending on how your system is set up, you may have the option to wrap up the visit. This may be useful for example if you need to finish some paper work after the customer has left. The wrap-up time is captured in statistics which makes it possible to track the actual time spent serving the customer.
To wrap up a visit, click Wrap up on the visit card.