Set up schedules for appointment booking
For appointments to be booked, the appointment management system needs to know:
when the services are available
when the resources needed for the services are available.
Schedules can be set up both on general level an on branch-specific level:
General schedules serve as a way to create common schedules that are shared in the whole organization.
Branch-specific schedules are useful in cases where a branch needs separate schedules, or where you don't want a branch's schedules to be affected by changes to the general schedules.
When you look at the list of branch-specific schedules, you can see if a schedule is general or branch-specific.
Note
Schedules define the general recurring availability of something, but there are also possibilities to make temporary deviations. Temporary changes to availability can be done for services and resources in the Plan view.
Create schedule (appointments)
In the Configuration panel, go to Appointments > General > Schedules or Branch-specific > Schedules, depending on if you want to create a general or a branch-specific schedule.
Click + Schedule. A window is displayed:
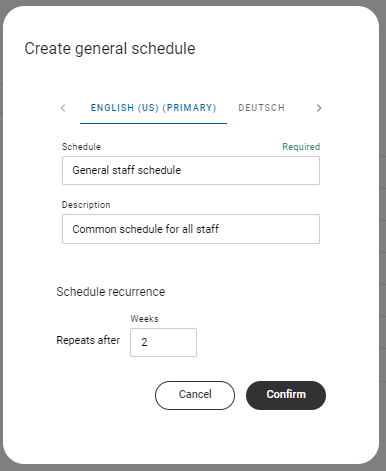
Enter a schedule name that will help you identify the schedule later and, optionally, a description.
If you have other languages, enter the schedule name for the other languages as well.
Select after how many weeks the schedule should repeat
Confirm.
You are now presented with options for setting up the schedule.
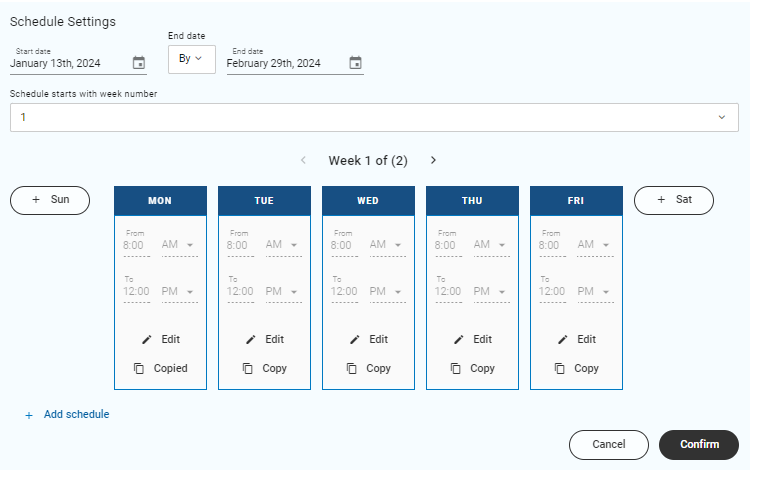
Set the start date and end date for when the schedule should apply. You can also set None as end date.
If you have selected the schedule to repeat after 2 or more weeks, select which week number the schedule should start with.
Select a day and click New.
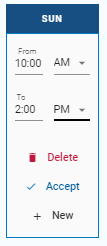
Set a time interval (in 12-hour format). To add more blocks of availability during the same day, click + New.
When all hours are filled in, click Accept.
Continue to fill in times for the rest of the days. You can copy the schedule from one day and paste it into another day.
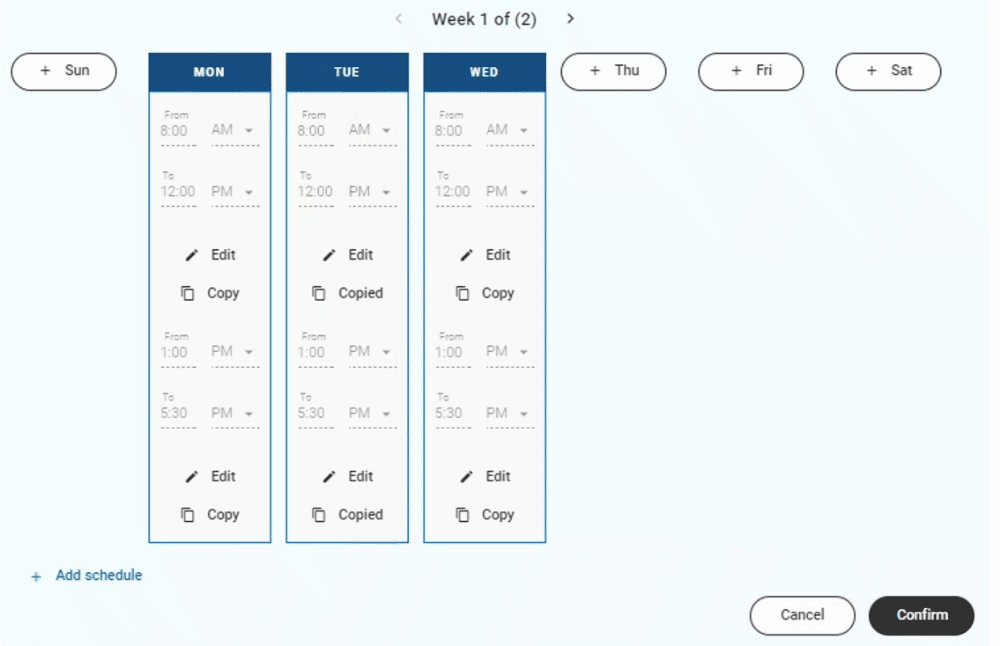
If you have different schedules for different weeks, fill in a week schedule for all weeks.
If you have set an end date for the schedule, you can add another schedule period by clicking + Add schedule.
When done, confirm.
Note
You have to accept the schedule for each day before you can confirm the full schedule.
Assign schedules to services (appointments)
The schedule assigned to a service defines when the service is open for bookings. Service schedules can be set on both general and branch-specific level.
In the Configuration panel, go to Appointments > General > Service settings or Branch-specific > Service settings, depending on if you want to set the schedule on general level or branch level.
Expand a service and go to Availability.
Click Manage > Edit.
Select a schedule.
Set the start date and end date for when the schedule should apply. You can also set None as end date.
In the Number of bookings setting, you set how many concurrent bookings of the service that are allowed. Select one of the following options:
Let resources limit: the number of concurrent bookings is determined by the number of available resources.
Set limit: the number of concurrent bookings for this service is defined by a set number.
For a more fine-grained configuration, check the Specify number of bookings per weekday checkbox.
Select a day and click New.
Select the time interval (in 12-hour format) when the service is available.
Either select to let resources limit the number of bookings during the selected time interval, or set a number of bookable timeslots.
If you have set an end date for the schedule, you can add another schedule period by clicking + Schedules.
When done, confirm.
Assign schedules to appointment resources
You can set a work schedule for each resource which defines when they are available. You can also set when they are available as resources in a pool with specific resources.
In the configuration panel, go to Appointments > Branch-specific > Resources and select a branch.
If you already have resources in the system, expand a resource and click Manage > Edit. If you don't have any resources yet, click + Add Staff/Room/Equipment.
On the Work schedule tab, select a schedule.
Set the start date and end date for when the schedule should apply. You can also set
Noneas end date.To make the resource available in a pool, go to the Pool assignment tab and select at least one pool and then select a schedule.
When done, confirm.
Assign schedules to appointment resource pools
Schedules can only be assigned to pools with virtual resources.
In the configuration panel, go to Appointments > Branch-specific > Resource pools and select a branch.
Expand a virtual resource pool and click Manage > Edit.
In the Pool Allocation section, select a schedule.
Set the start date and end date for when the schedule should apply. You can also set
Noneas end date.Enter the number of available resources in the pool.
When done, confirm.
Manage schedules (appointments)
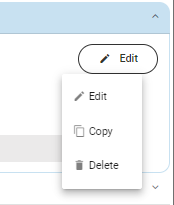
To manage schedules, go to Configuration > Appointments > General > Schedules or Branch-specific > Schedules, depending on if you want to manage general or branch-specific schedules. In the list of schedules, you have the following options:
To change a schedule, click Edit > Edit. Then follow the same procedure as when creating the schedule. If you want to revert your changes, click Cancel and your change will not be saved. Note that you cannot edit the recurrence of the schedule. If you are in the branch-specific configuration, you cannot edit a general schedule.
To copy a schedule, click Edit > Copy. This way, you can use a schedule as a template when creating another schedule.
To delete a schedule, click Edit > Delete. Note that a schedule can't be deleted if it's in use, i.e. associated with a service or resource. A deleted schedule cannot be restored.
Set up schedules for closed days (appointments)
You can set up a schedule for closed days when no appointments can be booked. Since the schedule is global and valid for all branches and all services, only one schedule can be enabled ("set as default").
In the Configuration panel, go to Closed days.
Click on the schedule you want to edit. Alternatively, click + Add. to add a new schedule.
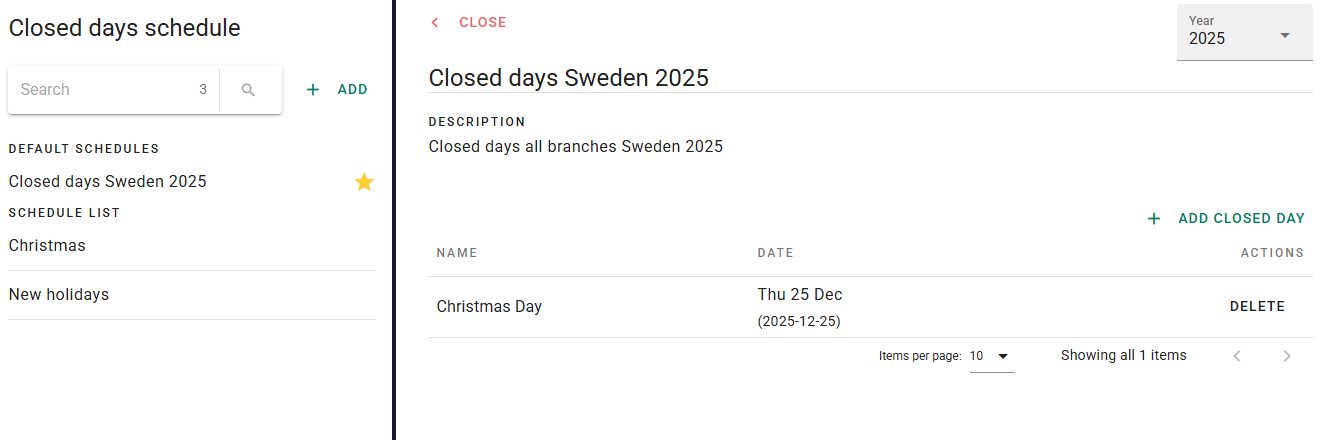
To add a closed day, click + Add closed day.
Note
Note that you cannot change the date of an already added day. Instead, you need to delete the closed day and add a new day.
Give the closed day a descriptive name, e.g. "Christmas Day" and select a date for the closed day, i.e. 2024-12-25.
Save.
Repeat for all closed days you want to add to the schedule.
If the schedule is not enabled and you want to enable it, toggle Set schedule as default.
Change name or delete schedules for closed days
To change the name or description of a schedule, open the schedule and click Edit.
To delete a schedule, open the schedule and click Delete. Note that you cannot delete an enabled schedule (the schedule set as "default").