Configure services for appointment booking
Services represent the choices the customers can make when booking an appointment. Which services your organization offers is defined in Business Configuration > Services. Here you need to enable the Booking enabled checkbox to make a service available for appointments. For more information about services, see Service configuration.
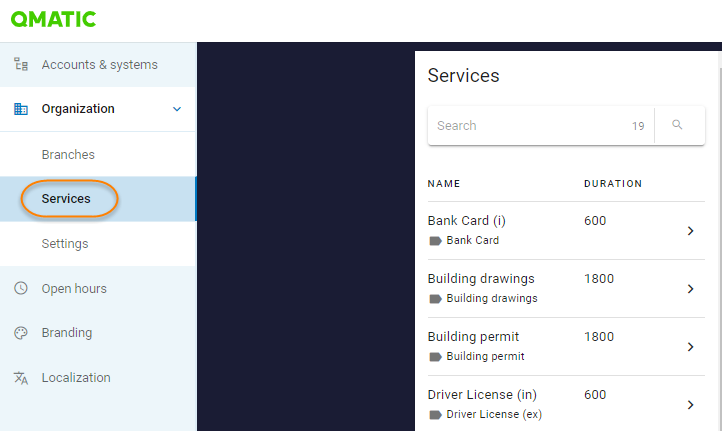
To see the services that are enabled for appointments and therefore synced to the Experience Cloud portal, go to Organization > Services. Here you can see the internal and external name, the internal and external description, and the service duration in seconds. This information comes from Business Configuration, but it can be edited here for the appointment booking system.
Note
The information from Business Configuration is only synced once, so if you make any changes in the Organization section, they won't be overwritten.
See also Configure translations for service and branch names and Change service description in the online booking.
There are many settings related to appointments that you configure per service.
Required configuration:
Optional:
Set up resource types for services
A resource type is a group of resources with the same qualities, for example all staff members with a certain skillset, or rooms or equipment with certain characteristics. Every appointment requires time from one or several resources. For each service, you need to define which resource type that is required to perform that service.
Resource types are divided into the following categories:
Staff
Room
Equipment
Resource types can only be set up on general level. The setup of resources, on the other hand, is done on a branch-specific level, which also is where you assign resources to a resource type.
To see which resource types you have in your system, go to Appointments > General > Resource types.
To edit the name of a resource type, select the resource type and click Edit > Edit name.
To delete a resource type, select the resource type and click Edit > Delete.
Add resource type
Go to Configuration > Appointments > General > Resource Types. and open the tab for the relevant category of resource types.
Click Add staff/room/equipment type.
Enter the name of the resource type.
If you have other languages, enter the name of the resource type for the other languages as well.
Confirm.
 |
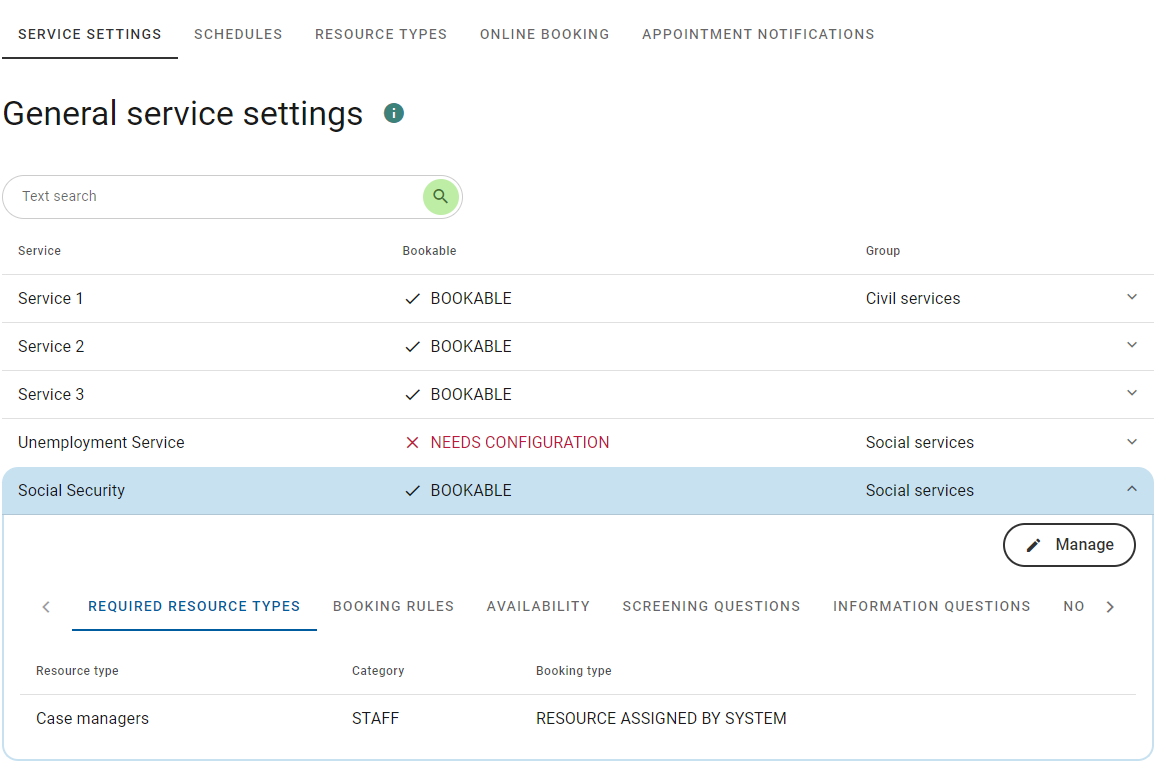
Define required resource types for a service
You must set which resource types are required to perform a service. Required resource types can be set both on general and branch level.
Make sure resource types are defined in Appointments > General > Resource types.
Go to Configuration > Appointments > General/Branch-specific > Service settings > Required resource types.
Click Manage > Edit.
Click Add resource type and select if you want to add a staff, room or equipment resource type.
Select a resource type from the drop-down.
For staff resource types, you also need to select a booking type, which defines how the resource should be selected when an appointment is booked. If you have virtual resources you can't use the "User mandatory selection" booking type since their are no individual resources that can be chosen. See Booking type options.
Click Add.
Add any additional required resource types for the service.
Confirm.
Booking type options
For each service, you need to add the required resource types. For each resource type added to a service, you must select a booking type, which defines how a resource is selected when an appointment is booked – either by a staff member in Book or Plan, or by a customer using the online booking app.
This topic lists the booking type options for staff, room and equipment resources.
Staff resources
Automatically assigned
The staff or customer cannot select a resource – the system assigns one automatically from available virtual or specific resources.
Works with: Book, Plan, and Online booking.
Pools: Virtual or specific.
User selection or automatically assigned
The staff or customer can pick a specific resource or let the system assign one from the pool (the "Any" option, which is pre-selected).
Works with: Book, Plan, and Online booking.
Pools: Specific resource pools only.
User selection only
The staff or customer must pick a specific resource – "Any" is not available.
Works with: Book, Plan, and Online booking.
Pools: Specific resources required (pool optional).
Room resources
Automatically assigned
The staff or customer cannot select a resource – the system assigns one automatically from available virtual or specific resources.
Works with: Book, Plan, and Online booking.
Pools: Virtual or specific.
User selection or automatically assigned
The staff can pick a specific resource or let the system assign one from the pool (the "Any" option, which is pre-selected).
Works with: Book and Plan only.
Caution
This option is not compatible with online booking and may prevent customers from booking appointments.
Pools: Specific room pools only.
User selection only
The staff must pick a specific resource – "Any" is not available.
Works with: Book and Plan only.
Caution
This option is not compatible with online booking and may prevent customers from booking appointments.
Equipment resources
Automatically assigned
The staff or customer cannot select a resource – the system assigns one automatically from available virtual or specific equipment resources.
Works with: Book, Plan and Online booking
Pools: Virtual or specific.
Configure booking rules
You can change booking rules such as the service duration, time slot interval, max number of customers that can book the service in the same appointment and more. The booking rules are in general enforced both in the online booking and in the staff booking interface.
To change the booking rules for a service, go to Configuration > Appointments > General/Branch-specific > Service Settings > Booking rules.
General settings:
Available for customers to book through online booking: if this box is checked, the service is available in the online booking. If not checked, only staff can book the service.
Customers need to verify their phone number by entering a 6-digit code: if checked, a 6-digit code is sent to the customer which the customer needs to enter.
Duration of service: the time (in minutes) that the service is expected to take.
Time slot intervall: The frequency (in minutes) with which available time slots appear to customers and staff in the calendar when booking an appointment. For example, with an interval of 30 minutes, you would see available time slots at 9:00, 9:30, 10:00 etc.
Max. number of customers allowed: the maximum number of customers that can be booked for this service.
Additional time for each occurrence: the time the system adds to the duration time per additional customer.
Date of birth field when booking service: if date of birth is disabled, optional or required when booking the service.
Basic rules:
Minimum time in advance for booking the service: the minimum hours or days in advance the service needs to be booked.
From now, the service is bookable ahead for: how many days the booking can be booked in advance.
Go to Configuration > Appointments > General or Branch-specific > Service Settings and open a service.
In the Booking rules tab, click Manage > Edit and change the following settings:
Max number of customers allowed: Set the maximum number of customers that can be added for a service in one appointment.
Additional time for each occurrence: This is the additional time added per extra person when a time slot is allocated for the appointment. Let's say the service normally takes 30 minutes to serve, maybe each extra person only adds 10 minutes.
When done, confirm.
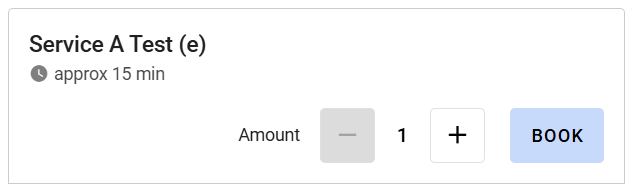
Users can now select the number of customers when booking a service.
 |
You can change the minimum time in advance an appointment must be booked, an also how long in advance an appointment can be booked. These settings are configured per service.
Go to Configuration > Appointments > General/Branch-specific > Service Settings and open a service.
Click Manage > Edit.
On the Booking rules tab, scroll down to the Basic rules section.
Change the settings Minimum time in advance for booking the service and From now, the service is bookable ahead for.
Confirm.
In cases where a resource pool is shared across several services, and some services have a higher demand than the others, you may want to ensure that there are still time slots open for the other services. This is done by limiting how many appointments can be booked at the same time for those services.
Go to Configuration > Appointments > General/Branch-specific > Service Settings > Availability.
Click Manage > Edit.
In the Number of bookings setting, select Set limit.
Specify a number. You can also specify the number of bookings per weekday. This gives you a more fine-grained control over the service limit.
Click Confirm.
For example, if you set the service limit to "10" for the service Passport, this means that the Passport service can only be booked 10 times at 9:00 even though there are more resources available.
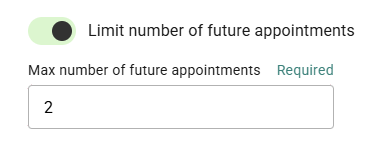
To prevent misuse of the appointment booking, and lower the number of no-shows, you can limit the number of future appointment for a customer. Customers are identified by email and phone number. The limit is set on general level per service and is only enforced in the online booking.
Note
We recommend combining this feature with the phone number verification feature.
To limit the number of appointments:
Go to Appointments > General > Service Settings and open a service.
In the Booking rules tab, click Manage > Edit.
Scroll down and enable Limit number of appointments.
Enter a value for Max number of future appointments.
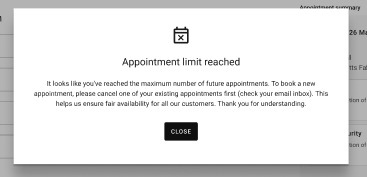
If a customer tries to book an appointment after they have reached the limit, they will see the following message:
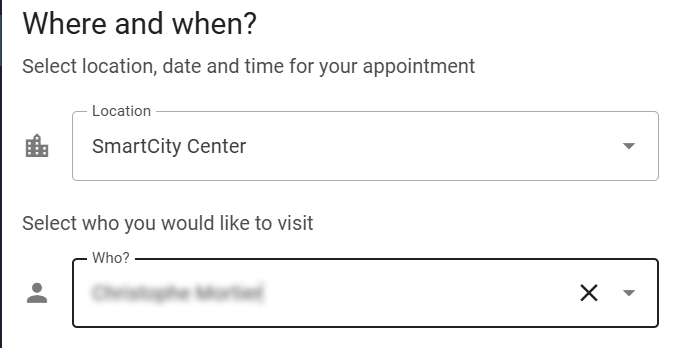
When a customers or staff members book appointments, you can allow them to select a specific staff member.
Prerequisites
You must have specific staff resources in the system and they must be assigned to a schedule.
Steps
Go to Configuration > Appointments > General or Branch-specific.
In the Service settings tab, open a service and click Manage > Edit.
Add a required staff resource type and select User selection or assigned by system or User mandatory selection. See Booking type options.
Confirm.
Repeat for all services where it should be possible to select a specific staff member.
Once the above steps are completed, customers and staff members will see the Who? field when booking an appointment.
 |
Add screening questions and information questions
You can set up screening questions and information questions for each service. The questions can only be set up on general level.
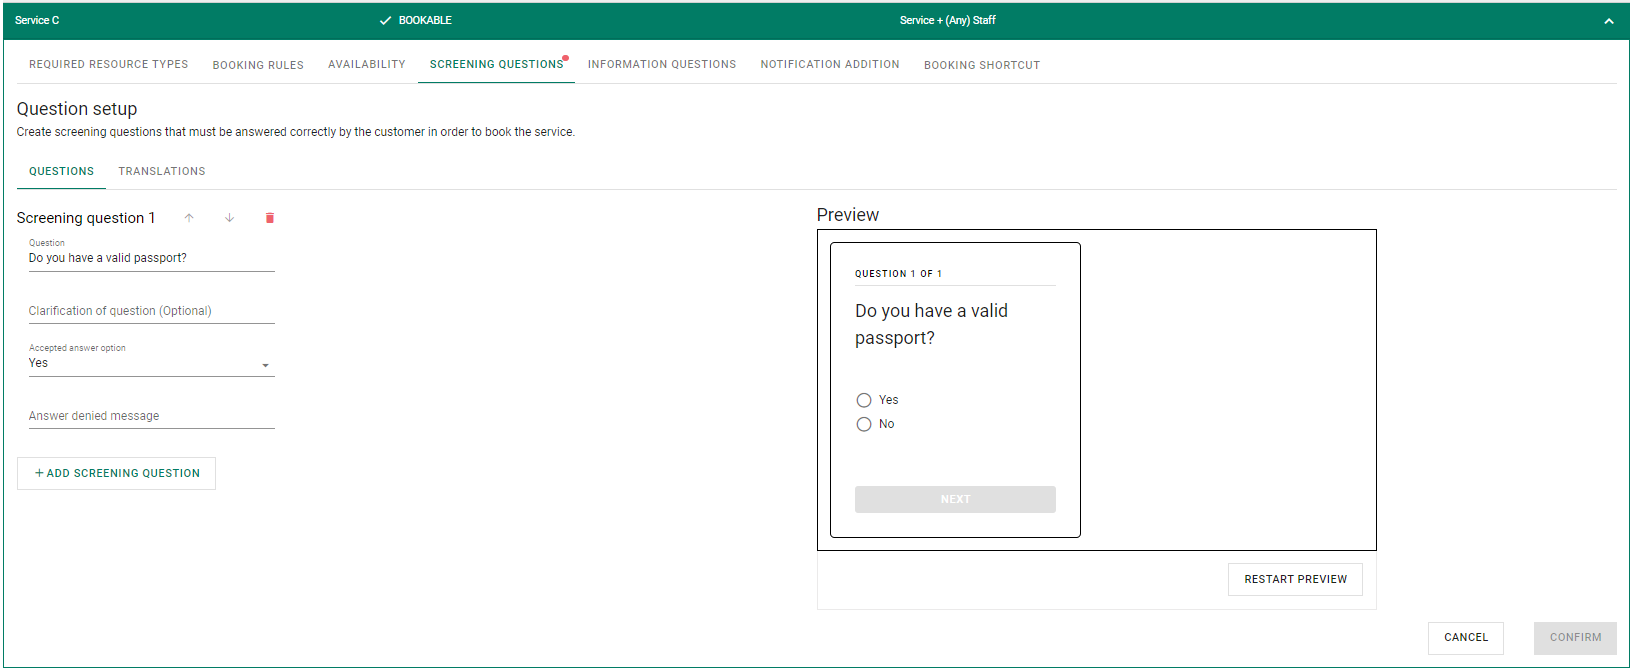
Add screening questions
You can use screening questions to filter out customers who do not qualify for booking a service. The answers to screening questions are not saved in the appointment information.
 |
To add a screening question:
To change the booking rules for a service, go to Appointments > General > Service Settings > Screening questions.
Click Manage > Edit.
Click Add screening question.
Enter a screening question of type yes-no.
If needed, clarify the question.
Select which of the answers "Yes" or "No" qualifies the customer to book the service.
Type a message to display for a customer who does not qualify for the service.
If you need more screening questions, repeat steps 3-7.
If you need to translate questions, go to the Translations tab.
When done, click Confirm.
To change the order of the questions, click the up and down arrows.
To delete a question, click Delete.
Add information questions
Use information questions to gather information about the customer who books the service. The question answers are saved in the Notes field when the appointment is checked in.
To add an information question:
To change the booking rules for a service, go to Appointments > General > Service Settings > Information questions.
Click Manage > Edit.
Click Add information question.
Write a question.
If needed, clarify the question.
Select if the customer is required to answer the question or not.
If more information questions are needed, repeat steps 3-6.
If you need to translate questions, go to the Translations tab.
When done, click Confirm.
To change the order of the questions, click the up and down arrows.
To delete a question, click Delete.
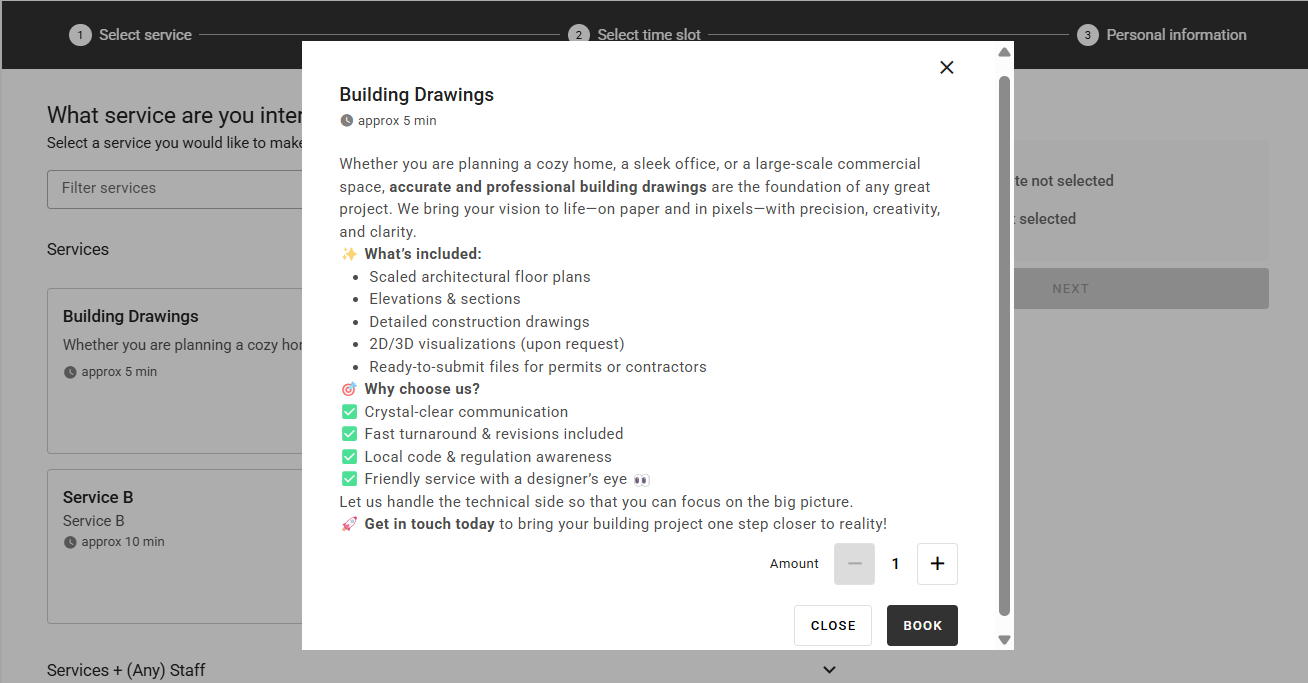
Change service description in the online booking
You can provide a more detailed description of each service on the online booking website. This helps customers understand what the service includes, who it's for, and how to prepare for their appointment.
Open the Configuration panel, and go to Organization > Services.
Select a service from the list.
The service descriptions are configured per language. Click Edit for one of the languages.
Tip
Start with the primary language used in your system.
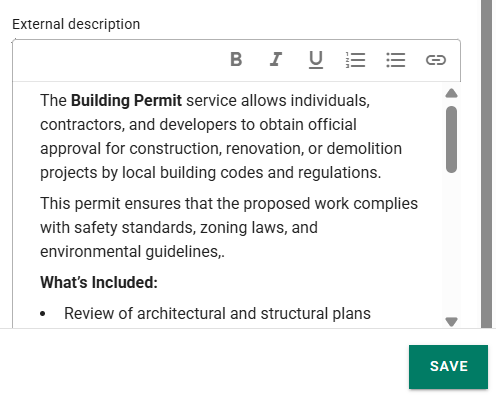
Enter the external service description in the External description field.
You can format the text using bold, italics, underline, bullet or numbered lists, and hyperlinks.
The maximum length is 2,000 characters, including formatting tags. A character counter will alert you when you reach the limit.
Save your changes.
Repeat for each enabled language. If a language version is left empty, no description will be shown when the user interface is displayed in that language.
Note
The external service description is initially synced from Business Configuration, but this sync occurs only once. If you update the description later in Business Configuration, it will not overwrite the version in Organization.
Example of how the service description is displayed on the online booking website: